NVMe Memory Tiering in VCF 9.1: Configuration Guide, Performance Benchmarks, and Sizing
Step-by-step guide to enabling NVMe Memory Tiering in VMware Cloud Foundation 9.1. Includes Broadcom performance benchmarks showing 2x VM density, monitoring thresholds, NVMe device selection, and sizing considerations.
The RAMpocalypse Is Real
If you have been anywhere near a server procurement conversation lately, you already know: memory has become the most expensive line item in your data center. Since 2023, when ChatGPT kicked off the AI infrastructure race, manufacturers have been shifting DDR5 production capacity toward High Bandwidth Memory for AI GPUs. Four consecutive quarters of price surges through 2025 have led to 2x or more increases in server costs — and memory alone now accounts for over 95% of the Bill of Materials.
The scarcity runs deep. Samsung's chip division has restricted component sales to Samsung's own mobile division because there is not enough to go around. Dell has started issuing 14-day "exploding contracts" on server quotes because pricing volatility makes longer commitments impossible. This is not a temporary supply hiccup — analysts predict infrastructure constraints will remain a long-term challenge even as supply gradually rebalances toward 2027.

Meanwhile, even when you can get the hardware, you are paying a premium for DRAM that most of your VMs are not actively using. In a typical virtualized environment, a large portion of allocated memory is inactive at any given time. VMs reserve it, but they are not touching it. You are paying top dollar for DRAM that is sitting cold.
Why AI Is Eating Your Memory Budget
Here is the irony: HBM (High Bandwidth Memory) and the DDR5 RDIMMs in your servers are built from the same fundamental material — DRAM silicon. The same fabs, the same wafers, the same base cells. The difference is packaging and architecture.
A standard DDR5 RDIMM is a flat module that plugs into a memory slot on your motherboard. It delivers solid bandwidth for general-purpose computing — enough for VMs, databases, and application workloads. HBM takes those same DRAM dies, stacks them vertically (8 or 12 layers high), connects them with thousands of through-silicon vias (TSVs), and mounts the stack directly on the GPU package using a silicon interposer. The result is 5–10x the bandwidth of DDR5 — exactly what AI training and inference need to keep GPU cores fed.
The problem is that every HBM stack consumes the same DRAM capacity that would otherwise become server memory. A single NVIDIA H200 GPU uses 141 GB of HBM3e. A server with 4 GPUs consumes more DRAM silicon in HBM alone than a fully loaded 2-socket virtualization host. When every hyperscaler and enterprise is racing to build AI clusters, the math is simple: there is not enough DRAM production to serve both markets at pre-AI prices.
This is not a manufacturing failure — it is a market reallocation. The fabs are running at capacity. The silicon is just going somewhere else.
What If You Could Use What You Already Have?
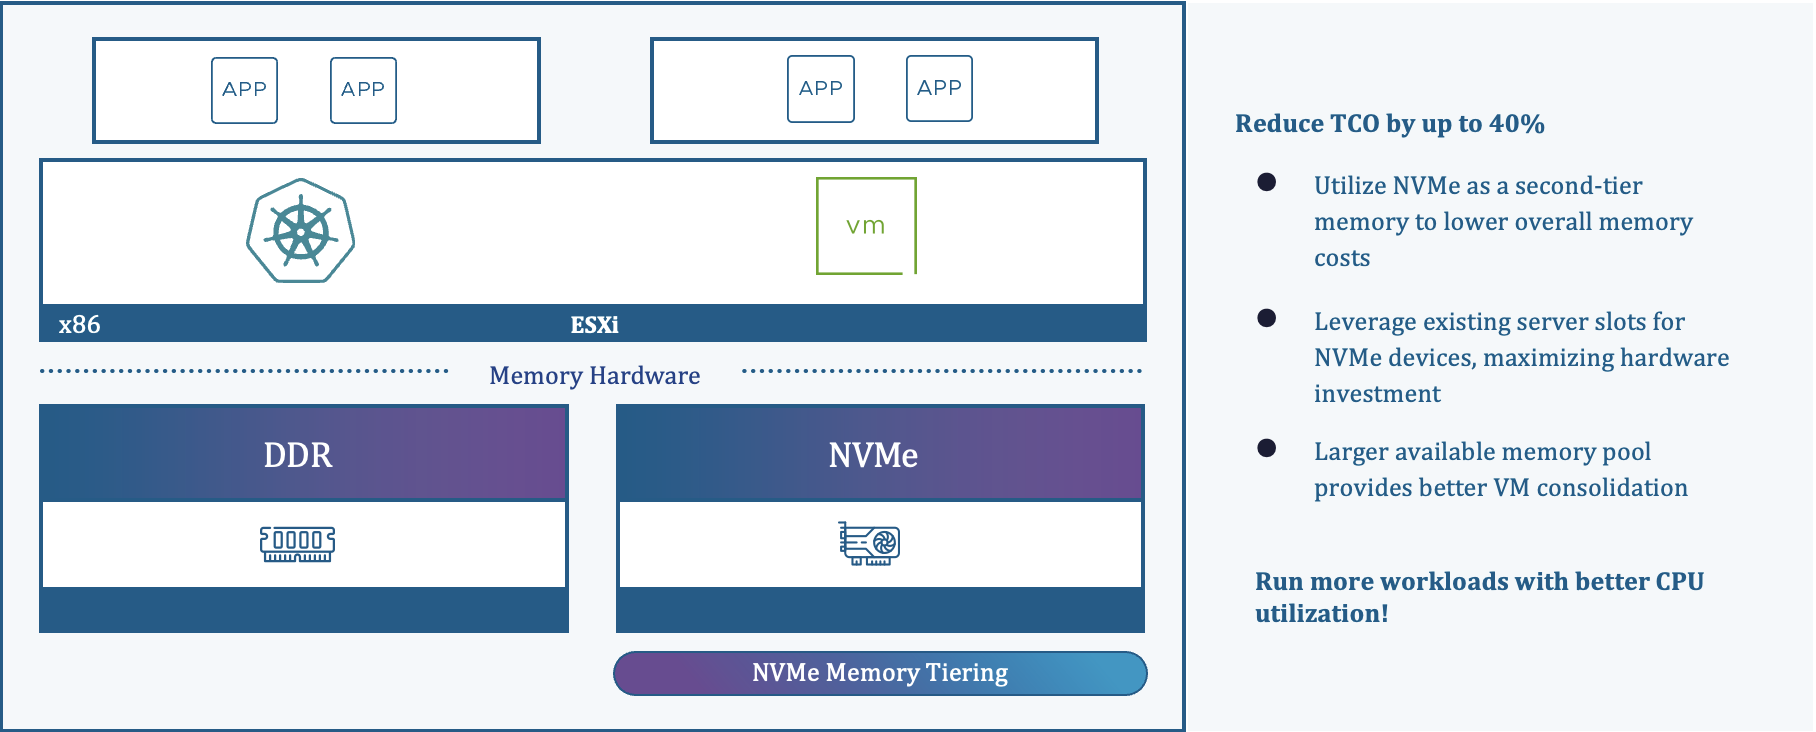
This is exactly what Memory Tiering in VCF 9.1 solves. The concept is straightforward: take NVMe SSDs that are already installed in your servers (or add inexpensive ones) and let the hypervisor use them as a secondary memory tier alongside DRAM.
The ESXi kernel classifies memory pages as hot or cold in real time. Hot pages — the ones your applications are actively reading and writing — stay in fast DRAM (Tier 0). Cold pages — allocated but inactive — migrate transparently to NVMe (Tier 1). Your VMs see one contiguous pool of memory. They have no idea anything changed.
The result: up to 4x more available memory per host, 2x better VM consolidation, significantly improved CPU efficiency (because your processors are no longer sitting idle on memory-starved hosts), and up to 40% lower TCO.
The Math That Makes This Obvious
DRAM costs roughly $10 per GB. NVMe costs roughly $1 per GB.
Say your cluster is using 4,600 GB of memory and you need to double capacity. Adding DRAM: approximately $46,000. Adding NVMe: approximately $7,200. That is nearly $39,000 in savings — on a single cluster.
VCF Operations in 9.1 includes a What-If analysis tool that models this for your specific environment before you buy anything. It identifies which clusters are strong candidates (typically those with active memory below 50% and free CPU above 50%), projects the additional VM count, and estimates cost savings based on current DRAM and NVMe pricing. You build the business case before you flip the switch.
What Changed in VCF 9.1
Memory Tiering shipped in VCF 9.0, but 9.1 addresses every piece of feedback from early adopters.
Performance gains. Up to 16% improvement in database workloads (HammerDB) and 12% CPU reduction in VMmark benchmarks compared to 9.0. The hypervisor's page classification and tier movement have been optimized significantly.
Software NVMe mirroring. In 9.0, redundancy required a hardware RAID controller — Tri-Mode or Intel VROC. That meant extra procurement, firmware management, and potential compatibility issues with vSAN. In 9.1, vSphere handles mirroring natively in software. No RAID controller. No extra cost. No operational overhead.
Simplified configuration. What used to be a multi-step process with manual ESXCLI commands is now a single unified pane using vSphere Configuration Profiles. NVMe partitions are created automatically, and the configuration no longer requires a host reboot — just maintenance mode. Over 50% reduction in setup time.
Enhanced observability. New summary cards in vCenter at both host and cluster level show configuration state, tier breakdowns, consumed versus active memory, and device health. You can drill down to per-VM tier bandwidth utilization. The VCF Operations dashboard gives you ongoing monitoring and the What-If analysis for planning.
VM profile support. In 9.0, certain VM profiles — security VMs, low-latency VMs, fault-tolerant VMs — could not power on when Memory Tiering was enabled. That restriction is gone in 9.1. You no longer need separate hosts to accommodate these workloads. Nested virtualization is also fully supported.
How to Enable Memory Tiering: Step by Step
Step 1: Assess your environment. Before buying anything, use the VCF Operations What-If analysis. Navigate to Capacity > Optimize > Resource Efficiency and select a cluster. The tool identifies clusters where active memory is below 50% of DRAM and CPU utilization is below 50% — these are your best candidates. It projects the additional VM count and estimated cost savings based on current DRAM versus NVMe pricing.
Step 2: Select compatible NVMe drives. You need local NVMe SSDs — Mixed Use, minimum 3 DWPD endurance, listed in the Broadcom Compatibility Guide under vSAN SSD. Filter by Device Type: NVMe, Endurance Class D, Performance Class F or G, DWPD 3+. Each major OEM has specific recommendations: Dell recommends Mixed-Use Enterprise NVMe AG drives (e.g., 1.6 TB U.2 with carrier for R750), HPE has the ProLiant Compute SSD Selector Tool filtered by Mixed Use + NVMe High Performance, and Lenovo lists ThinkSystem CD8P or PM1745 Mixed Use PCIe 5.0 drives. Existing vSAN cache disks cannot be repurposed, but vSAN data disks can be removed from the disk group and reassigned.
Step 3: Install the NVMe drives. This requires physical data center access. Choose the PCIe slot with the best bandwidth and least contention with other PCIe devices — check your server's owner manual. Delete any existing partitions on the device before proceeding (see Broadcom KB 323144).
Step 4: Enable Memory Tiering at the cluster level. In the vCenter UI, select your cluster, go to Configure > Desired State > Configuration. Under the Draft tab, navigate to esx > memtier > nvme and click Configure Settings. Set enable to True, select the NVMe device for each host by BIOS UUID, and optionally configure a mirror device for software mirroring. Set the tier_size_pct (default 100, meaning 1:1 DRAM:NVMe ratio — you can go up to 400%). Click Save. The Configuration Manager automatically places each host in maintenance mode and applies the configuration.
Alternatively, via ESXCLI per host: Place the host in maintenance mode, then run esxcli memtier device list to see available devices, followed by esxcli memtier enable -d <device>. To enable software mirroring: esxcli memtier enable -d <device_1,device_2>. To enable encryption and set a custom ratio: esxcli memtier enable -d <device> -c t -r 50.
Step 5: Configure redundancy. New in 9.1 — software NVMe mirroring eliminates the need for a hardware RAID controller. Just specify two NVMe devices (primary + mirror) during activation. Data is replicated at the same partition and block number. The mirror device must be the same size or larger than the primary. If you prefer hardware RAID, Intel VROC and Tri-Mode controllers are also supported.
Step 6: Verify and monitor. Check the Memory card on the cluster Summary tab — it shows how many hosts have Memory Tiering enabled. Per host, run esxcli memtier status get and esxcli memtier config get to confirm. In VCF Operations, the Memory Tiering dashboard shows Tier 0 (DRAM) and Tier 1 (NVMe) total capacity and usage, with drill-down to per-VM tier bandwidth.
Step 7: Exclude latency-sensitive VMs (if needed). For VMs that need all memory in DRAM — in-memory databases, HFT, telco workloads — power off the VM, go to Edit Settings > VM Options > Advanced Parameters, set sched.mem.enableTiering to FALSE, reserve full VM memory, then power on.
Monitoring Memory Tiering in Production
Enabling Memory Tiering is the easy part. Keeping it healthy requires ongoing monitoring. The Broadcom performance whitepaper identifies three critical metrics — and provides clear thresholds for each.
Active Memory as a Percentage of DRAM
This is your primary health indicator. Active memory tells you how much of the host's DRAM is being used by hot pages — the memory your VMs are actually touching right now. The rest is cold and safely living on the NVMe tier.
Keep active memory at or below 50% of DRAM capacity — this is the green zone where performance impact is negligible. Every benchmark in the whitepaper that delivered single-digit performance loss had active memory at or below this threshold. Between 50% and 75%, test and monitor closely — some workloads handle this fine, others do not. Above 75%, expect significant performance degradation.
Where to find it: In vCenter, go to Monitor > Performance > Overview and look for the Active counter in the Memory section (reported in KB). In VCF Operations, navigate to Metrics > Memory > Guest Active. From the CLI, use esxtop and look for TCHD (touched memory in MB) on the memory screen — sum the TCHD across all VMs to get the host-wide total.
NVMe Device Read Latency
This tells you how fast the NVMe tier is servicing DRAM misses — when a hot page is not in DRAM and needs to be fetched from NVMe, latency is the cost your application pays.
Below 200 microseconds is healthy — the benchmarks consistently delivered good performance at this level. Between 200 and 400 microseconds, investigate: your device may be undersized, your workload mix may have shifted, or active memory may have crept above 50%. Above 400 microseconds, expect visible impact on application performance.
Where to find it: In vCenter, go to Monitor > Performance > Advanced, then click Chart Options and select memory read latency and memory write latency. The chart shows real-time and historical latency for the NVMe tier device.
NVMe Device Read Bandwidth
Read bandwidth is a proxy for DRAM miss rate — how much data is being fetched from the NVMe tier because it was not found in DRAM. If read bandwidth exceeds 200 MBps sustained, start checking your device latencies closely. High bandwidth alone does not necessarily mean poor performance (the VMmark benchmark ran above 200 MBps with latencies still around 100 microseconds on a high-performance device), but it is an early warning signal.
Where to find it: In vCenter, go to Monitor > Performance > Advanced, then click Chart Options and select memory read bandwidth and memory write bandwidth. Write bandwidth shows cold pages being demoted to NVMe; read bandwidth shows pages being promoted back to DRAM.
Per-VM Drill Down
If you suspect a particular VM is underperforming, check its individual NVMe read bandwidth. A VM with high read bandwidth relative to others on the same host is fetching more data from the NVMe tier — meaning more of its memory is active than the tier can efficiently handle. You may need to exclude that VM from tiering (set sched.mem.enableTiering to FALSE) or move it to a host with more DRAM headroom.
Where to find it: In vCenter, select the VM, go to Monitor > Performance > Advanced, and select memory read bandwidth. To compare multiple VMs, use the pop-out chart feature (three lines below the View dropdown) and overlay read bandwidth for several VMs simultaneously.
CPU Headroom
Memory Tiering has a CPU cost — the page classification engine, tier movement, and NVMe I/O all consume cycles. Make sure host CPU utilization on a non-tiered host does not exceed 75% before enabling Memory Tiering. If you are already CPU-constrained, adding tiering will not help and could make things worse. The sweet spot is hosts that are memory-bound with idle CPU — which, as the Oracle benchmark showed (43% CPU jumping to 85% after tiering), is extremely common in production environments.
One additional guardrail: avoid "monster VMs" — those larger than 32 vCPUs and 512 GB — with Memory Tiering. The page classification overhead scales with VM size, and very large VMs with high active memory ratios can push the NVMe device beyond its performance envelope.
Real-World Performance: What the Benchmarks Show
Talk is cheap. Let us look at what Broadcom's performance engineering team actually measured. Their July 2025 whitepaper tested Memory Tiering across VDI, enterprise applications, and database workloads using industry-standard benchmarks — Login Enterprise, VMmark, HammerDB, and DVD Store. The results are consistent: 2x VM density with less than 10% performance loss across the board.
VDI (Login Enterprise). On a single Dell R760 with dual Intel Xeon 8480 processors and 1 TB DRAM, Memory Tiering doubled VDI capacity from 120 to 240 sessions with less than a 6% drop in Login Enterprise's End-User Experience (EUX) score — from 8.6 to 8.3. That is a 3.5% difference. Outlook opened 0.16 seconds slower. Excel and PowerPoint start times increased by 0.002 seconds. These are not numbers your users will notice.
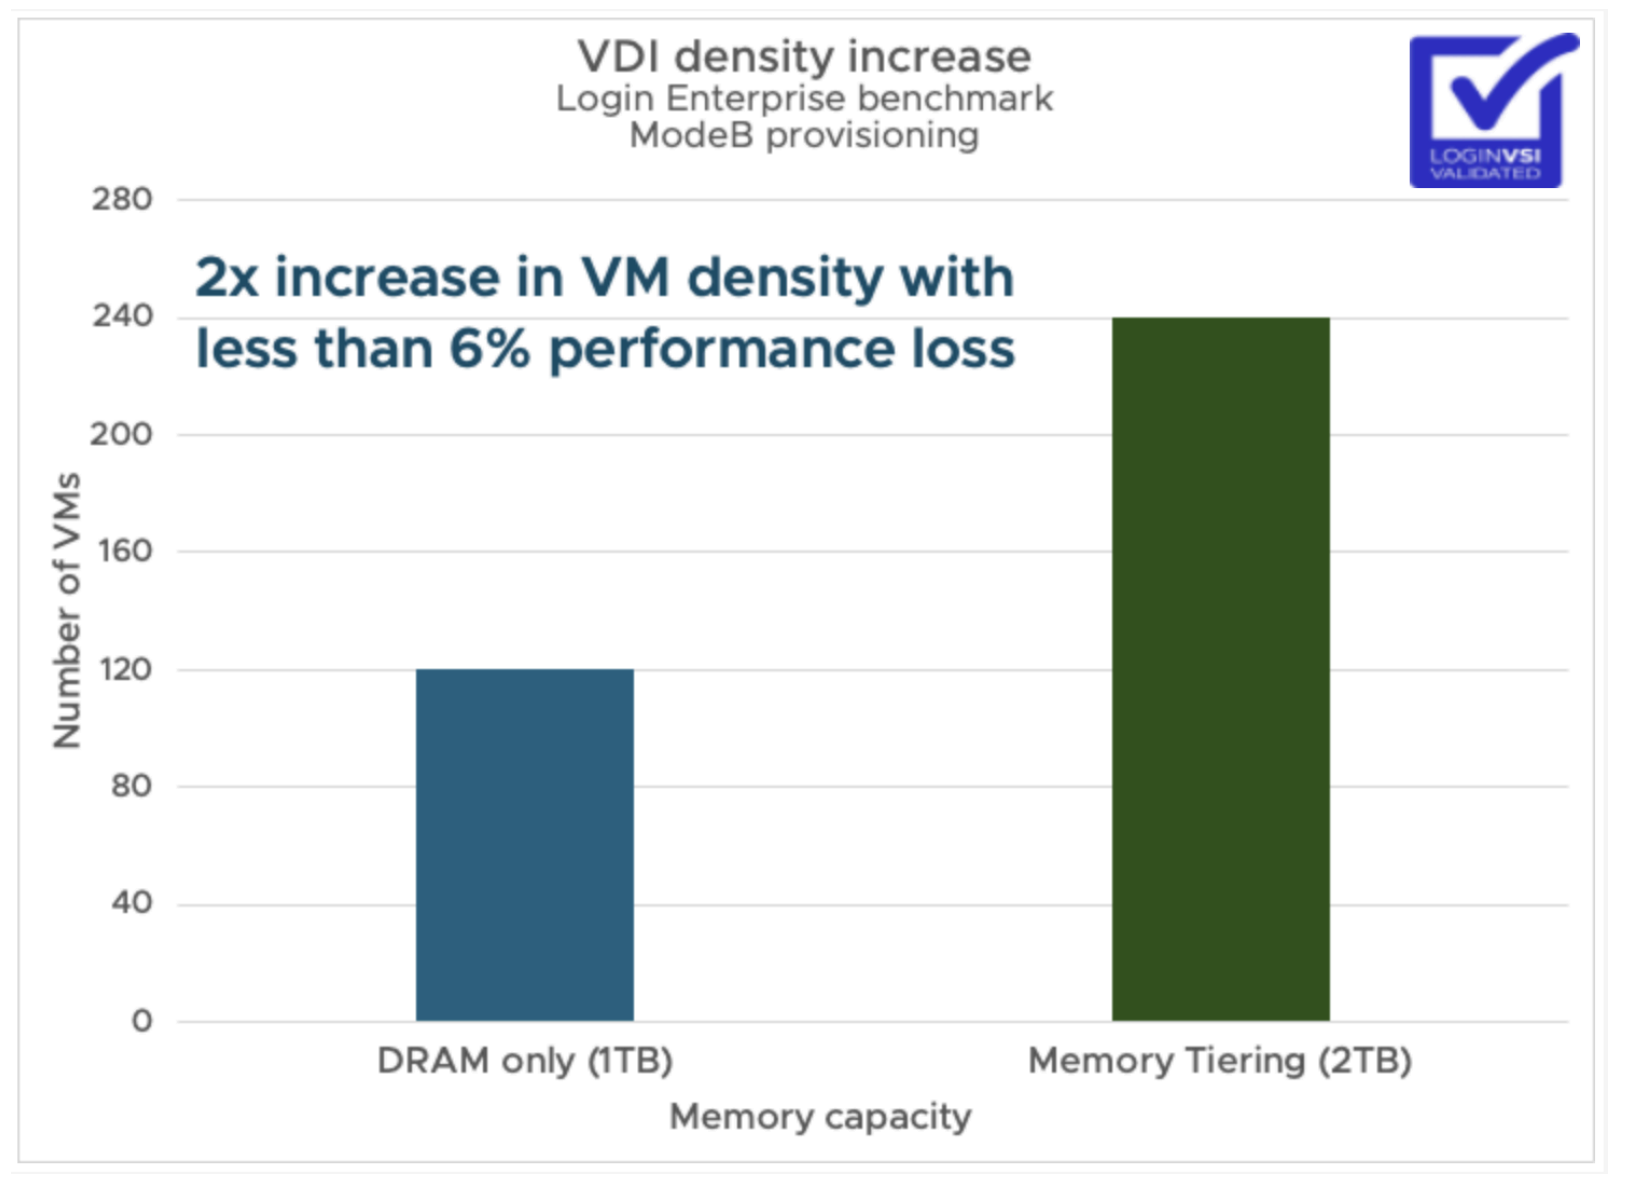
In ModeA provisioning with instant clones and page sharing, the results were even better: 160 to 320 VMs with only a 1.27% performance loss when comparing equivalent small-page configurations. On a 3-node vSAN cluster, ModeA provisioning doubled VMs from 300 to 600 per cluster with zero measurable performance loss — the EUX score actually came in at 7.0 for Memory Tiering versus 6.9 for DRAM only.
Enterprise Applications (VMmark). VMmark 3.1 ran 19-VM tiles with workloads including DVD Store, Weathervane, and standby services — each tile consuming 376 GB of memory and 31 vCPUs. Memory Tiering doubled the tile count from 3 to 6 (57 to 114 VMs) with less than 5% performance loss. The NVMe device maintained read latencies around 100 microseconds throughout the test.
Oracle Database (DVD Store). On a single-socket AMD EPYC 9755 with 768 GB DRAM, Oracle 21c VMs went from 4 to 8 with less than 5% performance loss. Here is the CPU story that matters: in the DRAM-only baseline, CPU utilization was capped at 43% — not because the processor was maxed out, but because there was no memory left to place more VMs. With Memory Tiering, CPU utilization reached 85%. That is not overhead — that is your existing hardware finally doing real work. The NVMe device averaged just 86 microseconds of read latency.
SQL Server (HammerDB). Microsoft SQL Server 2022 on Windows Server VMs doubled from 6 to 12 instances with less than 10% performance loss. Active memory settled at about 50% of DRAM capacity during steady-state operation — right in the sweet spot for Memory Tiering efficiency.
MySQL (HammerDB). MySQL 8.0 VMs doubled from 8 to 16 with less than 5% performance loss. In configurations with higher think times (more realistic for production), scaling was linear — doubling VMs doubled throughput, with minimal Memory Tiering overhead absorbed by the application's natural wait cycles.
vMotion. VM performance stays unaffected during migration. The migration itself takes longer — 82 seconds versus 23.5 seconds in the baseline — because the pre-copy phase reads cold pages from the slower NVMe tier. But VM downtime remains under 1 second and guest performance penalty stays below 5%. DRS is fully aware of tiered hosts and balances accordingly.
Your Old Servers Are Not Done Yet
Here is where it gets interesting for organizations under budget pressure. VCF 9 still supports older CPU generations that most people assumed were end of life.
Intel Cascade Lake servers, for example, are marked as "VCF Supported. Confirm w/Vendor" in the Broadcom Compatibility Guide. They run VCF 9, they are supported for the full duration of this major release, and they do not require any RPQ or special qualification from VMware. You just need to confirm hardware-level support with your OEM.
That means if you have a rack of Cascade Lake servers that still have years of life in them, you do not need to replace them to run VCF 9. And if those servers have empty NVMe slots — or you can add inexpensive NVMe drives — Memory Tiering gives those older hosts a second life. More VMs, better CPU utilization, lower cost per workload. All without a forklift upgrade.
This is the practical play: instead of waiting 6 months for new servers at inflated prices, enable Memory Tiering on what you have today. Extend the useful life of your existing fleet while you plan your next hardware refresh on your own timeline — not the supply chain's.
Sizing Considerations
NVMe device requirements. The drives must be local (not over fabric), mixed-use with at least 3 DWPD endurance, and listed in the Broadcom Compatibility Guide under vSAN SSD. Select devices with high endurance (Class D) and high performance class capable of more than 100,000 writes per second. Existing vSAN cache disks cannot be reused, but vSAN data disks can be repurposed after removal from the disk group.
DRAM-to-NVMe ratio. The system defaults to a 1:1 ratio, capped at 4 TB of NVMe per host. If your NVMe capacity is smaller than your DRAM, the system uses the smaller value. Dedicate the NVMe device solely to Memory Tiering for optimal performance.
Workload fit. Memory Tiering works best for general-purpose workloads where a meaningful portion of memory is inactive — VDI, web servers, application servers, development environments. Avoid enabling it for latency-sensitive workloads like in-memory databases, high-frequency trading systems, or telco applications where most memory is actively consumed.
Redundancy. Use software NVMe mirroring (new in 9.1) or hardware RAID. A single NVMe device failure without mirroring means losing the tier-1 memory pages on that device.
Memory overcommit. Do not use memory overcommit when Memory Tiering is activated. With the additional NVMe capacity available, overcommit is unnecessary and can cause performance issues if VM memory gets tiered more frequently than expected.
vMotion impact. vMotion works seamlessly with Memory Tiering, but migrations take longer — benchmark testing showed 82 seconds versus 23.5 seconds in the baseline for a 4-VM host evacuation. The slowdown occurs during the pre-copy phase where cold pages are read from the slower NVMe device. VM downtime remains under 1 second and guest penalty stays below 5%.
The Bottom Line
The server market is not getting easier. Memory prices are not coming down. But your infrastructure does not have to wait for either.
Memory Tiering in VCF 9.1 lets you extract significantly more capacity from the hardware you already own — including older servers that still have years of useful life. The economics are clear: $1/GB NVMe versus $10/GB DRAM. The technology is production-ready: Broadcom's own benchmarks show 2x VM density with less than 10% performance loss across VDI, enterprise applications, and database workloads. And the tooling — from What-If analysis to per-VM observability — gives you the visibility to deploy with confidence.
If your CPUs are underutilized because you ran out of memory, this is your fix.
References:
- Memory Tiering over NVMe — vSphere 9.1 Documentation↗
- Memory Tiering Performance: VMware Cloud Foundation 9.0 — Broadcom Performance Study (July 2025)↗
- Using Memory Tiering for Resource Efficiency — VCF Operations↗
- Advanced Memory Tiering Enhancements in VCF 9.1 — VMware Blog↗
- Memory Tiering Resource Hub↗
- Memory Tiering Considerations and Best Practices↗
- Memory Tiering Assessment Tool — Community Script for Pre-Deployment Analysis↗
- Deprecated CPU Systems in ESX 9.0 — Broadcom KB 428874↗
Discussion
No comments yet. Be the first to start the discussion.